Welcome to my Page! Feel free to have a look around and view my work.

Sunday 26 September 2010

Evaluation

From creating my own pinhole camera and taking pictures with it I have learnt a lot. Before we started this project I wasn’t even sure what a pinhole camera was, or how it worked, now I’m beginning to understand both. I now know how to make my very own pinhole camera from scratch and could hopefully make an even better one second time round, and could perhaps use a curved tin/box to experiment with different effects. The box I made worked very well though as it was completely light proof and luckily I didn’t have to fiddle around with it to get it to work.  If I were to make another pinhole camera I would want my box to have a bigger width and depth so I could capture a larger picture, the ones I took with my camera were quite small therefore I had to be very precise when taking my picture, I had to point it at only a small area, when I would have liked to have taken pictures of larger views.
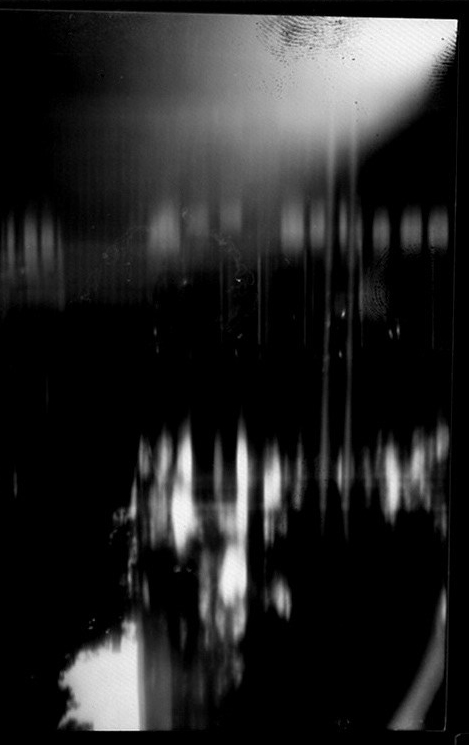
I am very pleased that all 6 photographs I took came out successful and weren’t all either completely black or completely white! If I were to re-take them, I would pay more detail to my foreground because in black and white pinhole pictures like this I think it adds more depth to them and makes them more interesting and detailed.
I have learnt lots of new things whilst making my pinhole camera and taking pictures, I learnt how to make the camera itself, how to take the pictures and how to develop them myself, and also how to scan them onto the computer ready for editing.
I think it is very important to learn the history behind photography and cinematography and where it started to be able to appreciate the technology we have today. It’s also very fun to develop your own pictures, instead of just using a lead and uploading them straight onto your computer. It’s always good to learn different techniques and skills and be able to understand and se for yourself how pinhole photography is created.

Evaluation Of My Photographs

Photograph 1 Negative : I had positioned my camera to some tree’s and a bike shed outside the college, unfortunately it was very windy and once I had opened my shutter and began to take a picture, the camera spun round. You can see that the photograph is very blurry and it’s hard to make sense of anything. But I do like the effect it had, it’s quite interesting.

Photograph 1 Positive: The positive version is very dark, perhaps over exposed. I prefer the negative version as it looks more interesting. I wasn’t very pleased with the way this picture came out overall though. I believe it was one of my first shots, and after a while I realised it was very important that the camera stayed still.
Photograph 2 Negative:  I was really impressed with this picture as it is very clear and I like the foreground and background in it of the tree’s and grass.

Photograph 2 Positive:  The detail that this picture shows is amazing, and I can’t quite get my head around it that I took this photo with just a box and a couple of other materials. There Is little blur to the picture and I am really pleased with it.  I like the fact I can see the sun rays shining down from the corner.

Photograph 3 Negative: This picture is a bit boring, as there is nothing really to it apart from some concrete and a door, but it’s different so I like it.

Photograph 3 Positive: The positive version of this picture is still a bit boring, but as it was the first picture I took I wasn’t sure how bigger area I could take a picture of, so after time I learnt to point my camera at something more specific.

Photograph 4 Negative:  This picture didn’t turn out well at all. There’s nothing to it. The only thing I like is the detail of the floor.

Photograph 4 Positive:  I like the simplicity to this photograph but don’t think it’s very good as it’s not interesting enough, if there was a few things in the foreground it could have made it better...

Photograph 5 Negative:  This was my only picture I took inside and I only left it for about 8 minutes when I think it should have been left for about 16! It didn’t come out very well at all, but the way the circled have appeared is quite nice.

Photograph 5 Positive:  same, again, the picture didn’t come out very well because it was under exposed but I love the way the circles have appeared in a line, I think it looks quite cool.

Photograph 6 Negative:  This photograph was taken of a stationary double Decker bus; I really like this in negative because it looks quite scary in a way, because it’s an unusual photograph. I also like the blurriness in the foreground and the angle in which it was taken.

Photograph 6 Positive: Once again I like the way the positive came out, the blur’s from the people standing are more visible, and the detail on the bus, like the wheels is very clear. I also like the different shades in the picture from black to white.

Friday 24 September 2010

...


The Development of camera's from the Camera Obscura to The digital camera we have today.

The first picture ever taken with a pinhole camera was in 1827 Joseph Nicephore Niepce made the first photographic image with a pinhole camera, or camera obscura. Since the pinhole camera there have been many other inventions that over time have developed into the technology we see today. Although Joseph Nicephore Niepce’s invention was amazing at the time, unfortunately the picture would soon fade away.  From this Louis Daguerre took many years working on shortening the exposure time needed from 8 hours to 30 minutes and found a way to stop the picture from fading. In 1839 Louis and Joseph came together to create something even better. Then came the negative to positive then tintypes to wet plate negatives and dry plate negatives to hand held camera’s, flexible roll film, to an amazing new development of colour photographs, Photographic films, photographic prints, Daguerreotype Cameras, box camera’s, flashlight powder, flashbulbs, 35 millimetres, Polaroid or instant photo’s, disposable camera’s and finally to the technology of today… digital camera’s.


Examples of Pinhole photography.


Thursday 23 September 2010

Now the photographs have been sent to my student email…

I can then open them and save them to the computer in my student area or onto my u.s.b. I then opened adobe Photoshop and opened this single file with all 6 photographs on. I used the crop tool to crop one of the pictures and when to the edit menu and clicked copy. I then went to file and new to create a new page, this appeared as a tab at the top of the other page I then clicked on this and went to edit again and clicked past. The single picture was now a file on its own. I pressed save as, and named it appropriate as “image1negative” and made sure it was in JPG format. And pressed save. Once it was saved I then went to image, adjustments and clicked invert to turn the picture into a positive. And went through the same saving process except I’ve saved it as “image1Positive” I did this for all 6 photographs so I ended up with 2 copies of each, one in negative and the other in positive.

Scanning my Photographs

 I placed all 6 pictures on the scanner, and logged in by using my student card. I then clicked on send, and selected “Send to myself” I also pressed format and changed it to the to JPG option. I then pressed the big green button on the dashboard which completes the process.

Developing my Photographs...

After each photograph I took I then had to develop it in the darkroom. I brought my camera back into the darkroom and only when inside the darkroom I removed the seal and the lid from my box. I then carefully took the piece of photographic paper and placed it shiny side down into “Developer” This is the chemicals used to reveal the photograph; I left my photograph in this solution for about 30 seconds.
I then took my photograph out of the developer using tongs and placed it in the “Stop” for 10 seconds. This stops the developer working and keeps the image the same.
I then placed my photo into the fixer for 30 seconds. After this I took out the photograph and brought it into the light to view my result, if I was happy with it I then took it back into the darkroom and left it in the fixer for another 5 minutes, my picture was then ready to be dried and put into my sketchbook. If I wasn’t happy with the result then I could just bin it straight away without putting it back into the fixer.
                                                  

Ready, Set...GO!

I was then ready to go out and take some pictures with my new homemade pinhole camera. I was anxious to see whether my pinhole camera was going to work. I found different locations that I thought would make a good photograph. I placed my camera on something sturdy when I had the camera positioned in the desired place I carefully lifted my shutter and left it open for the time needed. I timed this on my phone for a hopefully accurate result. I then closed my shutter whilst the camera was in the same position and only after I had done this I moved my camera. All of the 6 photographs I took with my pinhole camera came out successful, whether they were good or not was another matter! But none came out completely black or white, which I was happy about.

How I made my pinhole camera...

Before I began to build my pinhole camera I needed to bring in a box, tin, tub or anything that could be made completely lightproof. I brought in a long shoe box. After this I marked a square about the size of a stamp at one end of my box, I then cut this out using a craft knife. I painted the inside of my box black, including the lid. I needed to make sure my box was completely covered in the black paint for best results. Whilst waiting for the paint to dry, I measured the length from one end (where my hole was) to the other end of my box. I measures 275mm, from this measurement I was then able to calculate the F-stop number which is the amount of time needed to capture my picture, I did this by dividing 275 by 0.8 which was;
F-343.75 To work out how long I needed to leave my shutter open inside and outside, we created a scale for an aperture size of F90 which made the exposure time for indoors, 4 minutes and for outside 30 seconds out) using this information I worked out that to take a picture inside I needed to leave it for 16 minutes indoors and 1minute 20 outside.
Once my paint was dry I cut a piece of foil to size to fit the hole in my camera, this was to be my lens. In the centre of the lens was a pinhole. I also need to make a shutter; I made this from black duct tape. I placed this over my lens lightly so I could still lift this up to reveal the lens or close it to hide the lens, It was still vital that when my shutter was closed it was impossible for any light to pass through the camera.
 The next thing I did was load my camera. This process had to be done in the darkroom. I brought my box into the dark room, and cut a piece of photographic paper to fit the end of my box. I stuck this down using double sided tape. After I made sure my paper was secure and I had stuck it the right way round, shiny side facing out I could then put the lid onto my box. It was vital to make sure that no light could get into my camera at all; if it did it was ruin the whole picture. The lid to my box had tiny gaps so I sealed this with duct tape. I also had to make sure my shutter was closed before I exposed my finished pinhole camera to the light outside the darkroom.

What Is a Pinhole Camera?

A Pinhole Camera, also known as camera obscura, or "dark chamber", is a simple optical imaging device in the shape of a closed box, tin or chamber. On one of its sides is a small hole about the size of a stamp which lets a small amount of focused light through , this lens can be opened and closed by using a secure shutter, allowing the exposure when needed.  This light is then projected onto the photographic paper at the other end of the camera (box) and a picture is created after by using the chemicals in the darkroom.