I've learnt what Logic Pro is, A Digital Audio Workstation (D.A.W) which means it has multitrack charactoristics, it can record audio, edit audio and apply plug-ins. Other examples of D.A.W's are Sonar, Pro tools, Sound booth and Adobe audition.
I've learnt about different file formats, and which is best for doing what with. For example these are different types MP3, AIFF, WAB, ACC, WAV and WMA are a few examples. MP3 is whats known as a LOSSY format because it compresses it which loses quality, a file like this is small therefor is excellent for uploading to the internet or sending. An AIFF on the other hand is a larger file format and is the opposite to a LOSSY, An AIFF is an interchangeable file format, this and WAV are both lostless which means they don't loose quality or compress.
I also learnt about inserts and how they allow plug in's to add effects and features for example, Pitch shifter is a plug in. You can add or remove a plug in at any time, and you can change it manually or let the computer change it for you automatically. I learn how to use automation, this fades in and out audio, i can also do this myself by using node's or choose effects that are pre-made and use them. This feautire has lots of benifits as you can tell the program what to do and when to do it, and it does it! I learnt what the snap setting was for and what settings there are :samples, smart and more and what they are best for when creating different things.
I learnt how to Bounce tracks and why you do it. Also what tracks and regions where. How using colours is helpful when aranging and organising your work. How to record audio from a recorder onto Logic Pro, how to correctly start a new project and how it's very important you save your work at the start. I learnt that a Digi Design Mbox was an audio outboard which routes sound in and out of the computer. I learnt how to change the preferences on Logic pro and System preferences on the dock, for my inputs and outputs and know when i need to change them. I've learnt how to download tracks legally from Youtube by using www.video2.net/mp3 this was really helpfull because i needed lots of different songs when creating my idents. Another thing i've learnt is what is needed when making an ident whether it's for a show promo, advert or station ident!
I also learnt a lot just from listening to other people's work in my group, It was interesting to see what people did and how there work was different to mine, it gave me idea's on how i could improve my work if i were to do it again. I also learnt a lot from listening to read rasio show Idents and show promo's It's interesting to see how they can be so different, depending who it's targeted at whether it's comical or not and what genre of music and type of person it's for.
I really enjoyed creating my jingles, i learnt a lot and had fun too! :)
Sunday, 3 October 2010
Friday, 1 October 2010
Radio Jingles, What we did... and evaluations.
First we created an Ident for our own radio show this had to include The name of our show, or our name or radio station. An Ident is a short piece of audio to tell people your identity.
http://www.supload.com/listen?s=BGkYID
Evaluation
This was the first thing we did, i found it fun to do and i think i did it with enthusiasm, I learnt what an ident was and why they're important in radio. because theyre was very little information to be included in this 5 second ident, i didn't find it hard sticking to 5 seconds. That was just the right amount of time to say what was needed. This first task was nice because i learnt all the basics how to use the audio recorder and transfer it onto the mac's how to use plug ins to insert effects to my work too. i was happy with my ident but if i were to do it again i would want to use different sound effects in the backround.
We also created a 30 second show promo to promote an upcoming show. i used mine to advertise my own show, i included the name of the show, what genre of music, what time and day it's on.
http://www.supload.com/listen?s=LPsHvL
http://www.supload.com/listen?s=tCoTvn
Evaluation
I invented a "Milli Tree" which would be sold in B&Q Stores, it basically just grows money! For me this was my favourate task to do because i was free to do whatever i liked, and use my inmaination to invent anything! Before i began to make my advert, and once i had my idea clear i thought of the music or sound effects i was going to use, because i knew thats what would grab the listeners attention. so i thought of songs related to money and came up with Lil Wayne - A Milli. I am so pleased i thought of this song because listening back i think it works really well, i wen't for the more, "In your face" approach to selling my product, by starting straight away and i tryed to make my voice much louder and enthusiastic. At first i had music at the beginning and end, but then decided to play the same music throughout the duration of my advert but just made it quieter, i think it sounds a lot more professional than it did before i'd made this change. I could have cut the parts i wanted better, and had more space inbetween each line, becasue some of the words don't even end propely becasue i accidently cut it too soon. I found it quite hard using the scissor tool when i was working with a tiny bit of audio and improving this is somthing i want to work on.
http://www.supload.com/listen?s=BGkYID
Evaluation
This was the first thing we did, i found it fun to do and i think i did it with enthusiasm, I learnt what an ident was and why they're important in radio. because theyre was very little information to be included in this 5 second ident, i didn't find it hard sticking to 5 seconds. That was just the right amount of time to say what was needed. This first task was nice because i learnt all the basics how to use the audio recorder and transfer it onto the mac's how to use plug ins to insert effects to my work too. i was happy with my ident but if i were to do it again i would want to use different sound effects in the backround.
We also created a 30 second show promo to promote an upcoming show. i used mine to advertise my own show, i included the name of the show, what genre of music, what time and day it's on.
http://www.supload.com/listen?s=LPsHvL
Script for show promo
"Make sure you tune into my show
Becks on the decks
I will be playing you the very best in r and b and hip hop
Tomorrow night from 9-10
Guaranteed to make you wanna’
“Shake your ass” ... "
Evaluation of My show promo
I am pleased with the show promo i made, i felt really confident with all the basic skills by the time i'd finished making it. I spent quite a long time downloading songs for the bases of my promo, which took a while as i had to go through each song and cut and erase the bits i did and didn't want. but once i had done this and used a couple of FX effects which were really helpful to link the clips from my songs together i also used the start of one song which had a really cool effect on it to join one clip to another. Although the script was quite short i managed to spread it out over the full 30 seconds so it wasn't all together and made the rest of the promo boring. I also tryed to find lyrics in songs that would fit in well, for example i used lyrics "Stop the track" By Beyonce- Diva, at the end. I am pleased with what i made, and found it interesting learning new skills.
We also had invent an imaginary product and make a 25 second advert to advertise it on the radio.
http://www.supload.com/listen?s=tCoTvn
Evaluation
I invented a "Milli Tree" which would be sold in B&Q Stores, it basically just grows money! For me this was my favourate task to do because i was free to do whatever i liked, and use my inmaination to invent anything! Before i began to make my advert, and once i had my idea clear i thought of the music or sound effects i was going to use, because i knew thats what would grab the listeners attention. so i thought of songs related to money and came up with Lil Wayne - A Milli. I am so pleased i thought of this song because listening back i think it works really well, i wen't for the more, "In your face" approach to selling my product, by starting straight away and i tryed to make my voice much louder and enthusiastic. At first i had music at the beginning and end, but then decided to play the same music throughout the duration of my advert but just made it quieter, i think it sounds a lot more professional than it did before i'd made this change. I could have cut the parts i wanted better, and had more space inbetween each line, becasue some of the words don't even end propely becasue i accidently cut it too soon. I found it quite hard using the scissor tool when i was working with a tiny bit of audio and improving this is somthing i want to work on.
Sunday, 26 September 2010
Evaluation
From creating my own pinhole camera and taking pictures with it I have learnt a lot. Before we started this project I wasn’t even sure what a pinhole camera was, or how it worked, now I’m beginning to understand both. I now know how to make my very own pinhole camera from scratch and could hopefully make an even better one second time round, and could perhaps use a curved tin/box to experiment with different effects. The box I made worked very well though as it was completely light proof and luckily I didn’t have to fiddle around with it to get it to work. If I were to make another pinhole camera I would want my box to have a bigger width and depth so I could capture a larger picture, the ones I took with my camera were quite small therefore I had to be very precise when taking my picture, I had to point it at only a small area, when I would have liked to have taken pictures of larger views.
I am very pleased that all 6 photographs I took came out successful and weren’t all either completely black or completely white! If I were to re-take them, I would pay more detail to my foreground because in black and white pinhole pictures like this I think it adds more depth to them and makes them more interesting and detailed.
I have learnt lots of new things whilst making my pinhole camera and taking pictures, I learnt how to make the camera itself, how to take the pictures and how to develop them myself, and also how to scan them onto the computer ready for editing.
I think it is very important to learn the history behind photography and cinematography and where it started to be able to appreciate the technology we have today. It’s also very fun to develop your own pictures, instead of just using a lead and uploading them straight onto your computer. It’s always good to learn different techniques and skills and be able to understand and se for yourself how pinhole photography is created.
Evaluation Of My Photographs
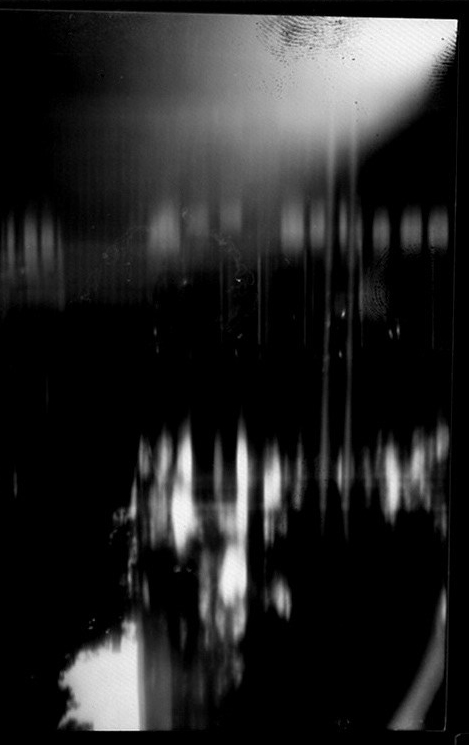
Photograph 1 Negative : I had positioned my camera to some tree’s and a bike shed outside the college, unfortunately it was very windy and once I had opened my shutter and began to take a picture, the camera spun round. You can see that the photograph is very blurry and it’s hard to make sense of anything. But I do like the effect it had, it’s quite interesting.


Photograph 1 Positive: The positive version is very dark, perhaps over exposed. I prefer the negative version as it looks more interesting. I wasn’t very pleased with the way this picture came out overall though. I believe it was one of my first shots, and after a while I realised it was very important that the camera stayed still.

Photograph 2 Negative: I was really impressed with this picture as it is very clear and I like the foreground and background in it of the tree’s and grass.


Photograph 2 Positive: The detail that this picture shows is amazing, and I can’t quite get my head around it that I took this photo with just a box and a couple of other materials. There Is little blur to the picture and I am really pleased with it. I like the fact I can see the sun rays shining down from the corner.


Photograph 3 Negative: This picture is a bit boring, as there is nothing really to it apart from some concrete and a door, but it’s different so I like it.


Photograph 3 Positive: The positive version of this picture is still a bit boring, but as it was the first picture I took I wasn’t sure how bigger area I could take a picture of, so after time I learnt to point my camera at something more specific.


Photograph 4 Negative: This picture didn’t turn out well at all. There’s nothing to it. The only thing I like is the detail of the floor.


Photograph 4 Positive: I like the simplicity to this photograph but don’t think it’s very good as it’s not interesting enough, if there was a few things in the foreground it could have made it better...


Photograph 5 Negative: This was my only picture I took inside and I only left it for about 8 minutes when I think it should have been left for about 16! It didn’t come out very well at all, but the way the circled have appeared is quite nice.


Photograph 5 Positive: same, again, the picture didn’t come out very well because it was under exposed but I love the way the circles have appeared in a line, I think it looks quite cool.


Photograph 6 Negative: This photograph was taken of a stationary double Decker bus; I really like this in negative because it looks quite scary in a way, because it’s an unusual photograph. I also like the blurriness in the foreground and the angle in which it was taken.


Photograph 6 Positive: Once again I like the way the positive came out, the blur’s from the people standing are more visible, and the detail on the bus, like the wheels is very clear. I also like the different shades in the picture from black to white.


Friday, 24 September 2010


The Development of camera's from the Camera Obscura to The digital camera we have today.
The first picture ever taken with a pinhole camera was in 1827 Joseph Nicephore Niepce made the first photographic image with a pinhole camera, or camera obscura. Since the pinhole camera there have been many other inventions that over time have developed into the technology we see today. Although Joseph Nicephore Niepce’s invention was amazing at the time, unfortunately the picture would soon fade away. From this Louis Daguerre took many years working on shortening the exposure time needed from 8 hours to 30 minutes and found a way to stop the picture from fading. In 1839 Louis and Joseph came together to create something even better. Then came the negative to positive then tintypes to wet plate negatives and dry plate negatives to hand held camera’s, flexible roll film, to an amazing new development of colour photographs, Photographic films, photographic prints, Daguerreotype Cameras, box camera’s, flashlight powder, flashbulbs, 35 millimetres, Polaroid or instant photo’s, disposable camera’s and finally to the technology of today… digital camera’s.


Examples of Pinhole photography.
Thursday, 23 September 2010
Now the photographs have been sent to my student email…
I can then open them and save them to the computer in my student area or onto my u.s.b. I then opened adobe Photoshop and opened this single file with all 6 photographs on. I used the crop tool to crop one of the pictures and when to the edit menu and clicked copy. I then went to file and new to create a new page, this appeared as a tab at the top of the other page I then clicked on this and went to edit again and clicked past. The single picture was now a file on its own. I pressed save as, and named it appropriate as “image1negative” and made sure it was in JPG format. And pressed save. Once it was saved I then went to image, adjustments and clicked invert to turn the picture into a positive. And went through the same saving process except I’ve saved it as “image1Positive” I did this for all 6 photographs so I ended up with 2 copies of each, one in negative and the other in positive.
Subscribe to:
Posts (Atom)